  561-996-6571 | AboutProvider Login       
Connect PBC icon

Your Health Information

Launch the YourCareCommunity Website

The YourCareCommunity website makes getting your health information easy. It is safe, secure, and convenient. With YourCareCommunity, you can see your information anytime with a secure internet.

Screenshot of the email containing the link to complete your account registration.

First, fill in your personal information to register. Next, an email link will be sent to you. You must click on the link in the email. Then, you will be directed to the Sign in page. Finally, you will be asked for your age, race, and other information. Remember to set a password and select a security question.

Signing in:

  1. Go to the website address.
  2. Type your User Name, (your e-mail address.)
  3. Type your Password. (Passwords are case-sensitive.)
  4. Click Submit. The Home page (shown below) will pop up.

If you forget your password:

  1. Click Forgot Password.
  2. Type your User Name, which is your e-mail address.
  3. Click Get New Password. A new page will pop up. It will ask you for your e-mail and send a new link.

After you sign in, the Home page (shown below) will pop up. Use the color tiles to move around the Patient Dashboard. If you prefer, you can also use the tabs at the top of the page.

Screenshot of the Patient Dashboard page

Personal Health Records:

Find out about your health. You can view test results, the medications your doctor gave you, vital signs, diagnoses, what to d after you leave the hospital, and more.

Profile

  • View and change your information, when needed. You can update your marital status, name, address, phone numbers, and more.
  • You can change your YourCareCommunity password.
  • You can change when you review notices and updates.
  • You can add or change who can represent you for health matters.

Documents

  • Download and upload medical papers, insurance and other important files.
  • Find documents sent by your care providers.

Messages

Receive and send private messages to your healthcare providers.

Screenshot of the Patient Dashboard tabs and Personal Health Records menu options

To open a page:

There are 2 ways to open a page:

  • Click a tab.
Or
  • Click the title of a tile from the Home page. (The Personal Health Records (PHR) page is shown below.)

To open another section of a page:

There are 2 ways to open a section of a page:

  • Click a link within a tile from the Home page.
Or
  • From an open page, click More and then click the section you want to see. (The Medications section of the PHR page is shown on the next page.)

To view new PHR information:

Once you click a page or open a section of a page, you can easily see where new information has been added:

  • PHR stands for "Personal Health Dashboard." On the PHR Dashboard, blue tiles are used for new (unviewed) updates. There is a faction showing total number of a updates. The total number is on the bottom. The number of new updates is on the top. For example, 2/4 allergies means that out of 4 total allergies, 2 are new.
Or
  • From a section of a page, click More. Items with new information will show in parentheses.

Screenshot of the Personal Health Record Dashboard

Screenshot of the Medications page under the P H R menu tab

You can decide if anyone else can have access to your health record. The person is known as a “health representative.” You can give the representative access to your private health information.

When you add a representative, you will receive an email. The health representative will also get an email. The representative must respond to the email. They can confirm (“verify”) they accept. If they do not accept, they will not have access to your health information.

Screenshot of the Mange Representatives menu option

To access the Representatives section:

  1. From the Patient Dashboard, click Profile.
  2. Click More.
  3. Click Representatives.

The Representatives section will display, allowing you to add or manage representatives.

To manage representatives:

  1. Click the name of the representative that you want to manage.
  2. Make appropriate changes.
  3. Click Edit Representative.

To add a representative:

  1. Click Add Representative.
  2. Complete the following fields. Required fields are marked with a red asterisk (*):
    • First Name*
    • Last Name*
    • Middle Name
    • Birthday*
    • Sex
    • Primary Phone Number*
    • Secondary Phone Number
    • User Name*
    • E-mail*
    • Address
  3. The Pin code field is created automatically. Write down your pin and give it to your health representative verbally. The representative can use the code to log-in and access your health information.
  4. Select the Allow Full Access check box.

NOTE: Full access will allow the representative to see all medical and vital information contained in this site.

Click Add Representative.

You can manage which e-mail notices you receive.

Screenshot of  the Update Account menu option from the Profile page

To manage notifications:

  1. From the Patient Dashboard, click Profile.
  2. Click More.
  3. Click Update Account.
  4. Scroll down to the bottom of the page.
  5. Clear check boxes for notifications that you don't want to receive. NOTE: If you do not check any boxes, you will automatically get ALL NOTICES.
  6. Click Save Changes.
Screenshot of the Messages panel and the Inbox page

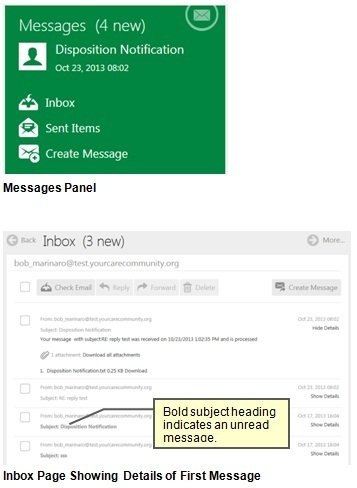
The Messages panel on the Patient Dashboard lets you see your inbox and sent items. It also lets you create new messages.

NOTE: The number of new or unread messages can be seen on the Messages panel. In the picture, “(4 new)” indicates 4 unread messages.

You can view incoming messages and outgoing messages. You can reply to, forward, or delete messages. You can also create new outgoing messages.

To view incoming message:

  1. From the Patient Dashboard, do one of the following:

    Click Messages.

    Click Inbox.

    The Inbox page will display and list all incoming messages.

    NOTE: Unread messages are indicated with bold text.

  2. For the message you want to view, click Show Details beside the message.

To view your outgoing messages:

  1. From the Patient Dashboard, click Sent Items.

    The Sent Items lists all outgoing messages.

  2. For the message you want to view, click Show Details beside the message.

    The contents of the message will display.

To create a new message:

Screenshots of the Create a Message Page. The Add Recipients Page. and the Add Attachments page
  1. From the Messages panel of the Patient Dashboard or the Inbox or Sent Items pages, click Create Message.

    screenshot of the create message button

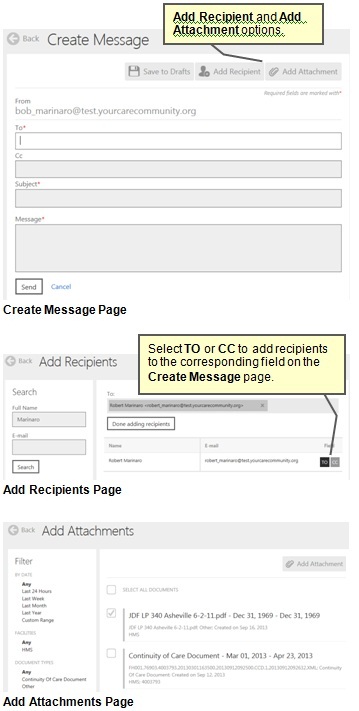
    The Create Messages page will display.

  2. Fill in the fields. Required fields are marked with a red asterisk (*):

    To* – add e-mail address for one or more recipient.

    To add recipients:

  3. Click Add Recipient.

    The Add Recipients page will display.

  4. Search for a recipient by name or e-mail address.
  5. From the search results click TO for each intended recipient.
  6. Click Done adding recipients.

    The Create Message page will show past recipients in the To field.

    Cc – add one or more carbon-copy recipient e-mail address. Use the same method described for adding recipients to the To field.

    Subject* – A few words about what is in your email.

    Message* – write your full message.

    1. (Optional) To add an attachment to the message:
    2. Click Add Attachment.

      The Add Attachments page will display.

    3. Select the check boxes to the left of the attachments you want to add.
    4. Click Add Attachment.

      The Create Message page will redisplay with the selected attachment or attachments added to your message.

      NOTE: To remove attachments from an unsent message, click the X beside the attachment under the Attached Files section of the Create Message page.

      screenshot of continuity of care button

    5. Click Send.

      The message will be delivered to the recipient and the Sent Items page will display.

Screenshot pointing to the Delete option

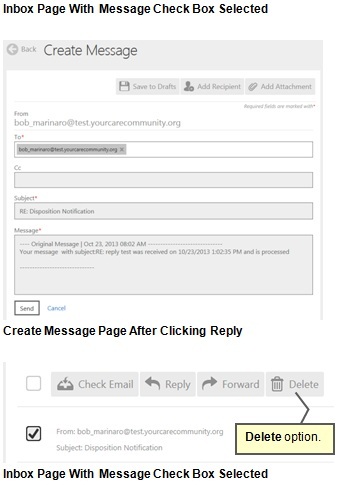
To reply to or forward a message:

  1. From the Inbox page, select the check box you want to reply to or forward.
  2. Click Reply or Forward.

    The Create Message page will display.

  3. Do one of the following:

    If you are replying to the message:

    1. Add your reply to the Message section of the page.
    2. Click Send.

If you are forwarding the message:

  1. Add a recipient to the To section of the page.
  2. Click Send.

The message will be delivered to the recipient and the Sent Items page will display.

NOTE: For instruction on adding recipients or attachments to a message, see To create a new message: on page 8.

To delete a message:

  1. From the Inbox or Sent Items page, select the check box to the left of the message you want to delete.
  2. NOTE: More than one message can be selected.

  3. Click Delete.

    A window will display asking if you are sure you want to delete the selected record or records.

  4. Click Yes.

    The message will be deleted and the Inbox or Sent Items page will redisplay.

Gray box with a blue question mark. Text to the right of the question mark says Help

The help system gives more information on using the site. To open, click Help from the toolbar at the top.

The Help page shows information about the page you are on. To find other help topics, type keywords in the Search box and then click the Search icon. Icon of a magnifying glass

More questions? Contact your provider:

Operating hours are from 8 AM - 5 PM EST.

561-996-6571

Top